本文最后更新于 2022年8月5日 晚上
前面曾经介绍了如何安装 nginx-quic,启用 HTTP/3 。目前的 nginx-quic 还是测试版本,代码更新很快,而且 nginx-quic 没有发行版,只能自己编译,如果很长时间没有对 nginx-quic 进行升级,很容易忘记如何操作,所以写下本篇文章记录 nginx-quic 编译升级步骤。
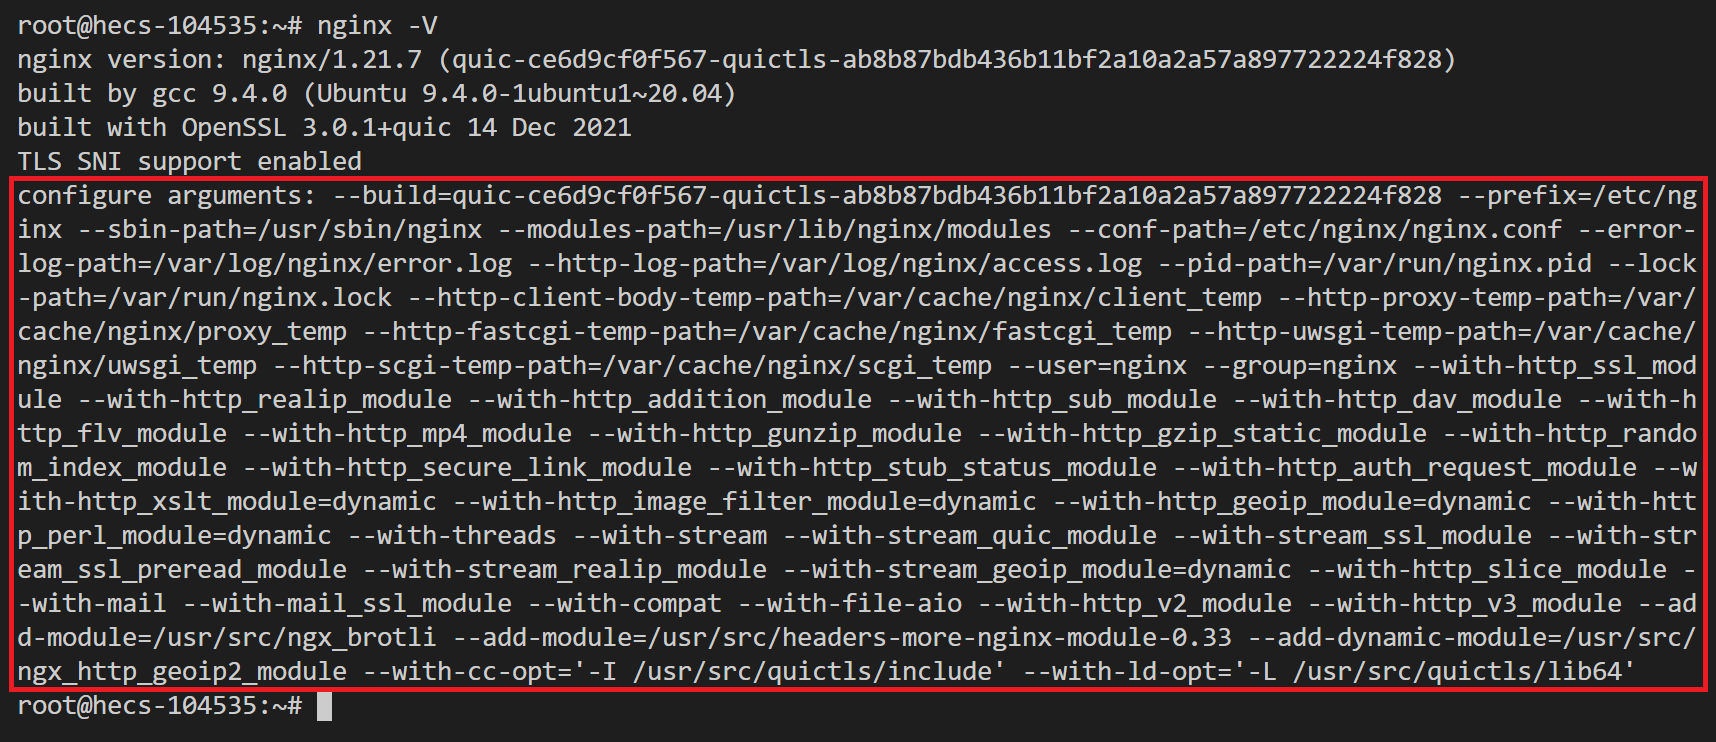
一、查看当前版本 在对 nginx-quic 进行编译升级之前,我们需要记录当前版本的编译配置。通常,我们会在 nginx 首次安装时添加了很多的模块,因此在升级过程中,编译配置参数尽量与当前版本一致,否则可能会导致 nginx 运行时出错。
在终端中输入以下命令,查看 nginx 的版本信息和编译配置参数:
如图 1 所示,红框部分就是 nginx 编译时的配置参数,鼠标选择后点击右键复制下来。
图1 nginx编译信息
二、备份 升级前务必做好备份!!!
在编译的配置参数中,通常设置有 nginx 的安装路径,以图 1 为例,--prefix=/etc/nginx 表示 nginx 安装在 /etc/nginx 目录中。如果你的配置参数中没有 --prefix,则 nginx 默认安装在 /usr/local/nginx。
使用系统的 tar 命令可以将 nginx 的安装目录打包压缩到用户目录:
1 tar -zcvf ~/nginx.tar.gz /etc/nginx
如果升级失败需要回滚,只需将备份的压缩包解压到原来的目录即可:
1
2
rm -r /etc/nginx && \
三、更新编译所需依赖 大部分的编译工具和依赖库在首次安装后都会随着系统一起更新,我们需要手动更新的只有:
nginx-quic 源码
quictls 加密模块
nginx brotli 压缩模块
ngx_security_headers 模块
通过 git log 命令可以查看本地仓库代码的当前版本(HEAD)。如果本地仓库的版本与 Github 上的最新版本一致,则可以跳过该模块更新。
1. 更新 nginx-quic 源代码 1 2 3 4 5 6 7 8 9 clone -b quic --rev $NGINX_COMMIT https://hg.nginx.org/nginx-quic /usr/src/nginx-$NGINX_VERSION
在 hg.nginx.org 上检索最新的 nginx-quic 提交版本时,注意选择 description 这一栏带有 quic 标签的提交版本,通常我们选择 nginx 版本号更新的提交版本。
在 nginx-quic: revision graph 页面可以查看到 nginx 主要版本和 quic 测试版本两个分支的更新进程,如下图所示,我们选择与主要版本合并的 quic 提交版本。
2. 更新 quictls 加密模块 1 2 3 4 5 6 7 8 9 cd /usr/src/openssl && \$QUICTLS_COMMIT && \
3. 更新 nginx brotli 压缩模块 1 2 3 4 5 6 7 8 cd /usr/src/ngx_brotli && \$NGX_BROTLI_COMMIT && \
1 2 3 4 5 6 7 cd /usr/src/ngx_security_headers && \$NGX_SECURITY_HEADERS_COMMIT && \
四、编译安装 nginx 首先,在终端中定义 $CONFIG 变量,对 nginx 编译进行配置,尽量保持不变。
1 2 3 4 5 6 7 8 9 10 11 12 13 14 15 16 17 18 19 20 21 22 23 24 25 26 27 28 29 30 31 32 33 34 35 36 37 38 CONFIG="\ --build=quic-$NGINX_COMMIT -quictls-$QUICTLS_COMMIT \ --prefix=/etc/nginx \ --sbin-path=/usr/sbin/nginx \ --modules-path=/usr/lib/nginx/modules \ --conf-path=/etc/nginx/nginx.conf \ --error-log-path=/var/log/nginx/error.log \ --http-log-path=/var/log/nginx/access.log \ --pid-path=/var/run/nginx.pid \ --lock-path=/var/run/nginx.lock \ --http-client-body-temp-path=/var/cache/nginx/client_temp \ --http-proxy-temp-path=/var/cache/nginx/proxy_temp \ --http-fastcgi-temp-path=/var/cache/nginx/fastcgi_temp \ --http-uwsgi-temp-path=/var/cache/nginx/uwsgi_temp \ --http-scgi-temp-path=/var/cache/nginx/scgi_temp \ --user=www-data \ --group=www-data \ --with-http_ssl_module \ --with-http_realip_module \ --with-http_gzip_static_module \ --with-http_gunzip_module \ --with-http_secure_link_module \ --with-http_stub_status_module \ --with-http_auth_request_module \ --with-http_slice_module \ --with-stream \ --with-stream_quic_module \ --with-stream_ssl_module \ --with-stream_ssl_preread_module \ --with-stream_realip_module \ --with-compat \ --with-threads \ --with-file-aio \ --with-http_v2_module \ --with-http_v3_module \ --add-module=/usr/src/ngx_brotli \ --add-module=/usr/src/ngx_security_headers \ "
详细说明请查看编译安装 nginx 。
然后,输入以下命令进行编译:
1
2
3
4
cd /usr/src/nginx-$NGINX_VERSION && \$CONFIG \"-I /usr/src/quictls/include" \"-L /usr/src/quictls/lib64"
配置无误后,便可以进行编译升级了,终端中输入以下指令:
1
2
3
4
5
make && \
五、检查 nginx 至此,nginx 就已经升级好了,你可以通过在终端中输入 nginx -V,查看 nginx 的版本:
1
2
3
4
nginx version: nginx/1 .23 .1 (quic-b30bec3d71d6-quictls-75 e940831d0570d6b020cfebf128ae500f424867)built by gcc 9 .4 .0 (Ubuntu 9 .4 .0 -1 ubuntu1~20 .04 .1 ) built with OpenSSL 3 .0 .5 +quic 5 Jul 2022 TLS SNI support enabled
最后,通过系统服务管理器启动 nginx:
1 systemctl start nginx.service
至此,升级步骤就全部完成了。你可以通过打开浏览器访问自己的网站来检查 nginx 运行是否正常。