配置 nginx.conf 实现 A+ 等级的 SSL 安全评级
本文最后更新于 2022年3月21日 晚上
上篇介绍了如何 安装 nginx-quic 来启用 HTTP/3,文章指出正确配置 nginx.conf 文件才能搭建网站并启用 HTTP/3。
默认的 nginx.conf 只提供了基本的配置,如果要搭建更安全的网站,需要进行更加复杂的配置。本篇文章将详细解释 nginx.conf 文件结构,并介绍如何配置 nginx.conf 来实现 A+ 等级的 SSL 安全评级。
本篇文章的第一部分介绍 nginx.conf 文件结构,主要帮助 nginx 初学者了解如何配置 nginx.conf 搭建网站虚拟主机,如果你知道如何配置 nginx.conf ,可以直接跳过第一部分,阅读第二部分>>启用 https 对网页内容进行加密<<。
一、 nginx.conf 文件结构
你可以在 /etc/nginx/ 目录下找到 nginx.conf 文件,使用文本编辑器打开,你会看到如下内容:
1 | |
文件中包含有几个块:
- 全局块:配置影响 nginx 全局的指令,例如设置运行 nginx 的用户、工作进程数(worker_processes)、错误日志保存路径和日志级别、pid 文件路径等。
- events 块:配置单个工作进程可以允许同时建立外部连接(worker_connections)的数量。
- http 块:配置虚拟主机和请求路由。其中 http 块中可以嵌套多个 server 块,server 块中又可以嵌套多个 location 块。
- stream 块:配置四层协议的转发、代理或者负载均衡等。需要在编译 nginx 时添加
--with-stream参数。 - mail 块:配置 Nginx 的邮件服务器。需要在编译 nginx 时添加
--with-mail参数。
每行开头的 # 表示注释,nginx 会忽略该行的内容,如果要启用,只需删除 # 即可。
1. 全局块
(1) 设置启用工作进程的用户
1 | |
通常使用默认的用户来启用 nginx 的工作进程(worker process)。例如编译 nginx 时,我们使用 --user=www-data 和 --group=www-data 参数,在不修改 user 配置的情况下,nginx 将以 www-data 用户启动工作进程。保持默认即可。不推荐使用 root 用户启用 nginx 的工作进程。
(2) 设置工作进程数
1 | |
设置 nginx 的工作进程数(worker_processes),默认为 1。你可以依据计算机 CPU 的线程数来进行设置,通过终端输入 cat /proc/cpuinfo 查看逻辑处理器即线程个数。例如计算机 CPU 为 4 核 8 线程,你可以将工作进程数设置为 8。当然你也可以设置为 auto。
过多的工作进程数没有太大意义,太多的进程,会存在切换的问题,反而会导致效率降低。
(3) 设置错误日志(error log)的写入路径和日志级别
1 | |
设置错误日志(error log)的写入路径和日志级别,默认路径为 /logs/error.log,推荐修改为 /var/log/nginx/error.log。日志级别分为 debug、info、notice、warn、error、crit、alert和emerg。默认为 error。启用 debug 级别的日志,需要在编译 nginx 时添加 --with-debug 参数。
(4) 设置 pid 文件路径
1 | |
设置存储主进程(master process) PID(进程 ID)的路径。默认为 logs/nginx.pid,推荐设置为 /var/run/nginx.pid。
2. events 块
1 | |
设置工作进程可以打开的最大并发连接数。通常保持默认即可。
3. http 块
我们主要通过设置 http 块来配置虚拟主机的相关参数,另外还可在 http 块中配置代理、缓存、日志等功能,或加载第三方模块和其他配置。
(1) 加载第三方模块或者配置
可以通过 include 指令来加载第三方模块或者其他配置文件。例如:
1 | |
(2) 设置响应类型
1 | |
Nginx 会根据 mime.types 定义的对应关系来告诉浏览器如何处理服务器传给浏览器的这个文件,是打开还是下载。如果 Web 程序没设置,nginx 也没对应文件的扩展名,就用 nginx 里默认的 default_type 定义的处理方式[1]。默认的 default_type 为 application/octet-stream。
(3) 设置访问日志(access log)的格式和写入路径
1 | |
设置访问日志(access log)的格式和写入路径。默认路径为 logs/access.log,推荐更改为 /var/logs/nginx/access.log。访问日志的格式可以保持默认,即预先定义好的 combined 格式。access_log 可以放在 http 块、server 块或 location 块,若放在 http 块,nginx 就会记录所有虚拟主机的访问日志;放在 server 块,nginx 只记录某个虚拟主机的访问日志;放在 location 块,nginx 只记录虚拟主机下某个 URI 的访问日志。
(4) 指定是否使用sendfile系统调用来传输文件
1 | |
sendfile 用于启用 sendfile() 系统调用来替换 read() 和 write() 调用,减少系统上下文切换从而提高性能,当 nginx 是静态文件服务器时,能极大提高 nginx 的性能表现[2]。默认为开启。
tcp_nopush 是 FreeBSD 的一个 socket 选项,对应 Linux 的 TCP_CORK,Nginx 里统一用 tcp_nopush 来控制它,并且只有在 sendfile on; 的情况下才会生效。启用它之后,数据包会累计到一定大小之后才会发送,减小了额外开销,提高网络效率。对于 nginx 配置文件中的 tcp_nopush,默认就是 tcp_nopush on; ,不需要特别指定。
(5) 设置长连接的超时时间
1 | |
keepalive_timeout 用于设置长连接的超时时间。开启 keep-alive,连接就不会中断,而是保持连接。当客户端发送另一个请求时,它会使用同一个连接。这一直继续到客户端或服务器端认为会话已经结束,其中一方中断连接。通过设置长连接的超时时间,可以让保持活动状态(keep-alive)的客户端在这个时间内会与服务器端一直保持打开状态。如果设置为 0 ,则会禁用保持活动状态(keep-alive)的客户端的连接。默认为 65 秒。
(6) 开启 gzip 压缩
1 | |
开启 gzip 压缩有助于将传输数据的大小减小一半甚至更多,推荐打开。
(7) 开启 brotli 压缩
1 | |
Brotli 是一款通用的无损压缩算法,它使用 LZ77 算法的一种现代变体(a modern variant of the LZ77 algorithm)、霍夫曼编码(Huffman coding)和二阶上下文建模(2nd order context modeling)的组合来压缩数据,其压缩率可与当前最佳的通用压缩方法相媲美。它在压缩速度上与 deflate 相似,但提供更高的压缩率,开启 Brotli 压缩可以优化网站访问速度[3]。
在 http 块、server 块或 location 块中添加 brotli on; 可以对网页响应内容进行 brotli 动态压缩。推荐开启。
添加 brotli_static on;,nginx 会检查是否存在扩展名为 .br 的预压缩文件。如果设置为 brotli_static always; 预压缩文件在所有情况下都会使用,无论客户端是否支持它。
(8) server 块
1 | |
通过添加 server 块来添加虚拟主机,http 块中可以嵌套多个 server 块。
每个 server 块中可以配置虚拟主机的监听 IP 或监听端口、协议类型以及服务器名称。nginx 通过请求头的“主机名(HOST)”,来确定请求应路由到哪个虚拟主机。
例如 listen 80; 表示监听 80 端口,server_name localhost; 表示虚拟主机名称为 localhost。 在浏览器中访问 http://localhost:80 便可以访问该虚拟主机。
charset 用于将字符集 “Content-Type” 添加到响应头中,并指定编码。如果此编码与指令 source_charset 中指示的编码不同,则执行重新编码。通常可以不用进行配置,当网页内容出现乱码时,可以通过在 http 块中添加 charset utf-8; 来解决。
error_page 404 /404.html; 定义 404 错误页面。error_page 500 502 503 504 /50x.html; 定义 50x 错误页面。
(9) location 块
location 指令是 nginx 中最关键的指令之一,location 指令的功能是用来匹配不同的 URI 请求,进而对请求做不同的处理和响应。
1 | |
location / 匹配任何请求,因为所有请求都是以 “/” 开始。当匹配成功,便会使用 /etc/nginx/html 目录里面的 index.html 或 index.htm 进行响应,客户端便会显示 index.html 或 index.htm 页面内容。通常指定网站的默认页面,例如本站 http://vickey.fun 的主页。
location = /50x.html 匹配 /50x.html 的请求,返回 /etc/nginx/html 目录里面的 50x.html 进行响应。
http 块、server 块、location 块的内容均需要用 { } 包裹。配置的时候不要忘记使用 } 结尾。
二、 启用 HTTPS,对网页内容进行加密
超文本传输安全协议(HyperText Transfer Protocol Secure,缩写:HTTPS;常称为 HTTP over TLS、HTTP over SSL 或 HTTP Secure)是一种通过计算机网络进行安全通信的传输协议。HTTPS 经由 HTTP 进行通信,但利用 SSL/TLS 来加密数据包。HTTPS 开发的主要目的,是提供对网站服务器的身份认证,保护交换资料的隐私与完整性[4]。
1. 所有访问跳转 HTTPS
HTTP 的 URL 由 “http://” 起始,默认使用 80 端口,而 HTTPS 的 URL 则由 “https://” 起始,默认使用 443 端口,所以两者使用不同的 server 块。
另外由于 HTTP 是明文传输,没有加密,无法防止中间人截获、盗取和篡改信息,非常不安全,所以推荐默认使用 HTTPS,在 http 块中添加下面的 server 块,可以让所有访问跳转至 HTTPS。
1 | |
2. 配置 HTTPS server 块
推荐使用 mozilla 提供的 SSL Configuration Generator。
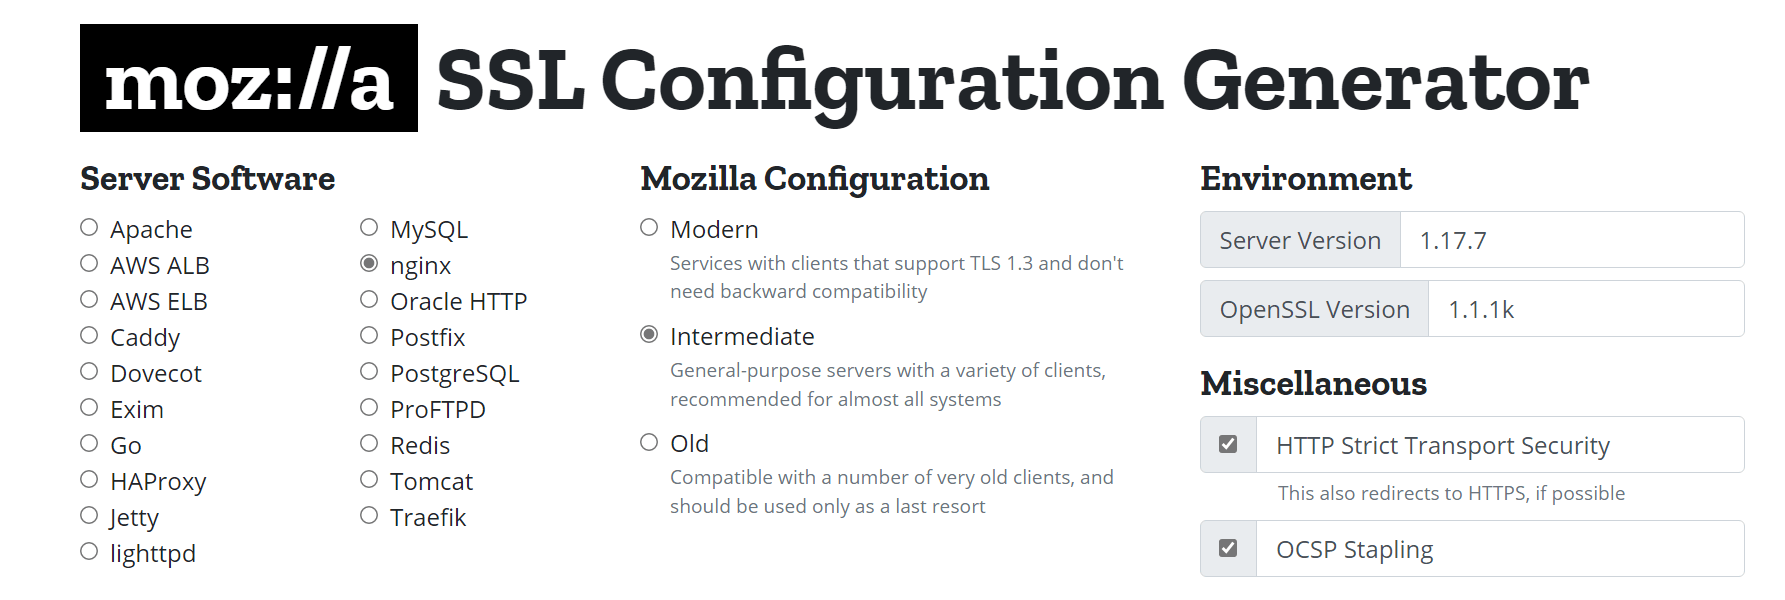
图1 SSL Configuration Generator
Server Software 选择 nginx,Mozilla Configuration 选择 Intermediate,Environment 中 Server Version 输入 1.21.7,OpenSSL Version 输入 3.0.1。Miscellaneous 中勾选 HTTP Strict Transport Security 和 OCSP Stapling。网页下面会自动显示兼容的客户端和 nginx 配置。
1 | |
其中需要配置的有 ssl_certificate、ssl_certificate_key、ssl_dhparam,分别对应 SSL 证书的路径、SSL 证书密钥的路径和 ssl_dhparam 的路径。
SSL 证书可以在你的域名提供商那里免费申请,或者使用 acme.sh 或者 certbot 申请免费的 SSL 证书。ssl_dhparam 可以通过 wget 或 curl 下载到指定的文件。例如输入下面的命令,将 ssl_dhparam 下载到 /etc/ssl/dhparam.pem。
1 | |
如果在 ssl_certificate 中配置的 SSL 证书为包含完整证书链的 Full-chain 证书,ssl_trusted_certificate 就不需要单独配置。如果系统的 DNS 服务正常, resolver 配置也是可选的。
3. 添加安全响应头并移除不安全响应头
通常 nginx 在响应请求时会显示 Server、X-Powered-By、X-Page-Speed、X-Varnish 等响应头,这些都会泄露服务器软件信息,所以这些响应头需要被移除。另外为了防止跨站脚本攻击(Cross-site scripting,简称 XSS),我们还需添加 X-Frame-Options、X-XSS-Protection、Referrer-Policy、X-Content-Type-Options响应头。
推荐在编译 nginx 时添加 ngx_security_headers 模块,该模块能够为网站添加安全响应头并移除不安全响应。只需在 http 块中添加 security_headers on; 即可。
4. 防止 0-RTT 重放攻击
如果开启了 TLS 1.3 的 ssl_early_data,服务器可能会遭受重放攻击(replay attacks)。因此需要在对应的块中添加 $ssl_early_data 变量。
1 | |
5. 域名 DNS 服务商中添加 CAA 记录
CAA 是一项防止 HTTPS 证书错误颁发的安全措施,遵从 IETF RFC6844。从 2017 年 9 月 8 日起,要求 CA(Certification Authority,证书颁发)机构执行 CAA 强制性检查。
在域名 DNS 中添加 CAA 记录,可以授权指定的 CA 机构为其域名颁发证书,防止域名证书劫持。如何添加 CAA 记录,可以参考 DNSPod 文档中心。
三、 测试 SSL 安全等级
Qualys SSL Labs 提供网站 SSL Server Test 来帮助网站管理员测试 Web 服务器的 SSL 安全水平。通过测试,我们可以查看服务器 HTTPS 配置是否正确。例如,本站的测试结果:

图2 SSL Server Test结果
如果你是腾讯云的用户的话,也可以使用腾讯云的 证书监控 SSLPod,例如本站的证书监控结果:https://sslpod.myssl.com/vickey.fun
四、 总结
现有网络环境错综复杂,网站如果使用 HTTP,访问的用户会存在很高的安全隐患,导致信息泄露、木马植入等情况出现。针对这一情况,为互联网提供安全服务而采用 HTTPS 已是大势所趋。HTTP 到 HTTPS 的转向可以帮助提升用户访问安全水平,所以推荐大家也加强个人网站的 SSL 安全等级。
参考资料
- SRE笔记. NGINX响应类型DEFAULT_TYPE. (https://sre.ink/nginx-default_type/) . March 4, 2018. ↩
- TinyChen. Nginx篇06-Sendfile指令及其原理. (https://tinychen.com/20200323-nginx-06-sendfile/) . March 23, 2020. ↩
- Github - google/ngx_brotli: NGINX module for Brotli compression. (https://github.com/google/ngx_brotli) ↩
- 超文本传输安全协议 - 维基百科,自由的百科全书. (https://zh.wikipedia.org/wiki/超文本传输安全协议) ↩